SWAMP COOLER TECH
Installation Recommendations for the Homeowner or Do-It-Yourselfer
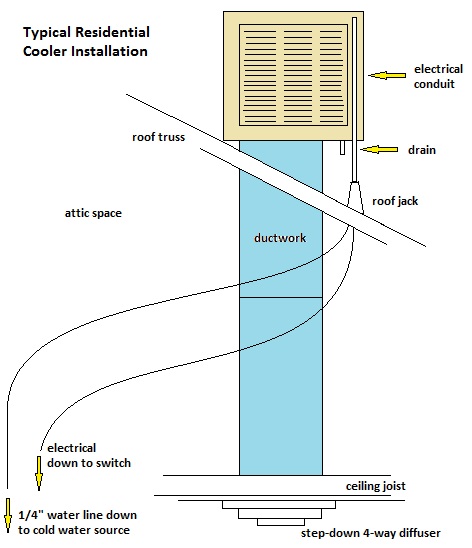
Shown above is a typical residential swamp cooler configuration. Quite simple. Most homeowners with desire, common sense, useful hands, and a good smattering of common household tools could undertake this swamp cooler installation.
A general knowledge of duct installation, plumbing, and basic 110 volt electrical knowledge is needed.
Most homes have a typical attic, as shown. Attics can become stifling. The less work performed in the attic - the better. Most of the duct work can be planned ahead of time, prepared on the ground, then either lifted up into place from the diffuser location inside, or dropped down into place from the roof. A good, strong set of teenage arms helps tremendously here.
The trick is measure once, then measure again, line your cut points up straight up and down, double-check your measurements, and then cut in the duct openings once. If your ductwork will indeed be installed straight up and down, you can use a plumb-bob to line up the ceiling and roof penetrations.
Start your swamp cooler installation. Choose the diffuser location
The main hallway is usually centrally located in the home, and is usually the best location choice for your swamp cooler 4-way diffuser. Once this location is determined and cut in, then the roof penetration can be determined.
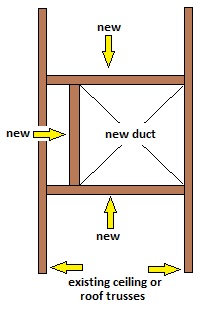
The ductwork needs to be located between the ceiling trusses. Do NOT cut out ceiling trusses or roof trusses. This could weaken the structural integrity of your ceiling or roof. Usually ceiling and roof trusses are set at 24" centers, which will leave 21" clear in between the trusses.
Also, the penetration into the attic from the ceiling will need to be framed on all four sides with solid wood. This is a mounting point for the ductwork, and will also serve as backing to attach the grille to later. (scroll down for pic)
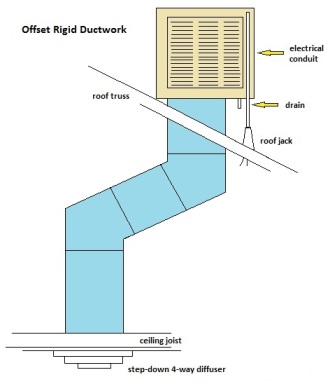 Your swamp cooler installation may require offset ductwork
If the hallway grille location does not line up straight with a clear path up through the roof, the ductwork may need to be offset, as pictured here. The best location for the swamp cooler is on the back side of the roof for aesthetic reasons.
This offset configuration is best if the ceiling and roof trusses do not line up, or if it is desired to get the unit more out of sight, or if the ductwork would hit the peak of the roof by going straight up and out.
DO NOT install the ductwork and cooler spanning the peak or ridge of the roof, or in a valley. Always offset if either of these scenarios exist. Not only are these scenarios unattractive on your roof, but flashing and keeping a good weather seal in either of these locations is near impossible.
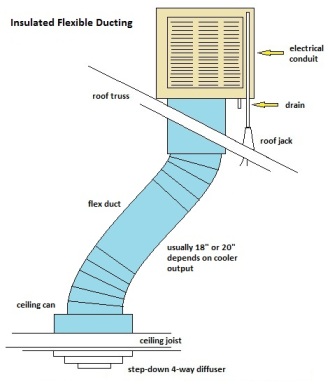 Flexible ducting
Another common swamp cooler installation configuration is to use large flexible insulated ductwork. This flexible ductwork comes in 18", 20", and 24", which are all commonly used for this purpose.
Use 18" for coolers 4500 cfm or smaller, 20" for up to 5500 cfm, and use 24" for 6500 cfm coolers.
Be aware that this ducting approach will restrict some air flow, and can be noisier than the rigid duct systems. Some do argue that the insulated ductwork actually helps quiet the air flow. Let's face it! As much air as a swamp cooler delivers into a home, they are all noisy!
This swamp cooler installation will require a section of rigid ducting down through the roof with an end cap and a round sheet metal collar the same size as the flex duct. You will also need a sheet metal can fabricated the same size as your ceiling diffuser opening, and another round collar tied into the end cap. Get your collars at least 8" long for ease of flex duct hook-up.
This configuration solves many issues the Do-It Yourselfer may encounter with his swamp cooler installation.
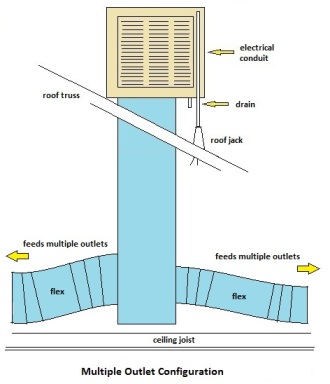 Multiple Outlets
Every once in a while someone decides upon a swamp cooler installation with multiple outlets. This configuration should be approached cautiously.
Remember swamp coolers dump a lot of water into the air stream. This makes the air heavy. If the duct runs are too long, or too numerous, or restricted, the air will simply die in the ductwork, and very little will actually reach the destination rooms.
This type of system can be enhanced with the installation of Updux into each room with an outlet.
UpDux are one way ducts which will open under increased barometric pressure, allowing air flow across the room by relief into the attic. The attic must be vented.
The ductwork itself should be kept as straight as possible. Wherever branches split off, a wye fitting should be used in preference to a tee.
Framing the ceiling or roof
As mentioned before, this is a very important step. Most common swamp coolers require 18x18 or 20x20 ductwork. These sizes will fit between most ceiling or attic trusses.
Position your first cut against the side of an existing truss and layout the penetration from there. Make sure this works well with the roof truss layout, as well. Just a smidgen of slack here will make your life easier come time to slide the ductwork into place.
Frame in the other 3 sides, as shown. This will provide a mounting point for the ductwork and also for the ceiling diffuser later.
Other Swamp Cooler Installation related pages
Swamp Cooler Tech: Wiring and Water Lines
Swamp Cooler Maintenance Tips
Swamp Cooler Roof Installation
Visit Swamp Cooler vs. Central Air Conditioniong page: The Debate Continues!
Return to Do-It-Yourself System Installation page
Return to Swamp Cooler main page
Depart Swamp Cooler Installation and Return to HOME
Enjoy this page? Please pay it forward. Here's how...
Would you prefer to share this page with others by linking to it?
- Click on the HTML link code below.
- Copy and paste it, adding a note of your own, into your blog, a Web page, forums, a blog comment,
your Facebook account, or anywhere that someone would find this page valuable.