


|
DO-IT-YOURSELF
| |||||


|
|


If your system will have a b-vent (double-wall) flue, it should be cut in and installed now, so the space necessary below does not get covered by ductwork. Double-wall flue pipe requires a minimum 1" clearance to combustibles. This means that all penetrations through the roof and floor must be overcut to accommodate this requirement. Then a sheet metal firestop must be fashioned to suspend the flue, ensure proper clearance, and seal the overcut holes. Flat sheet metal with a round hole matching the flue diameter works well. Rough in complete.
Our example home has a centrally located mechanical room in the basement. First set the furnace/air handler (AHU) in place allowing space for the return air drop to be installed on one side or the other of the unit. If your system will have central air conditioning, the evaporator coil will then be set on top of the AHU. For the do-it-yourselfer a cased coil is the best route to go. A cased coil also is easier to access the coil inside for future servicing. An uncased coil needs to be built into the supply plenum ensuring that all air diverts up through the coil, and tight sealed penetrations must be provided for the refrigeration lines. Serviceability (cleaning) of an uncased coil is difficult, at best.
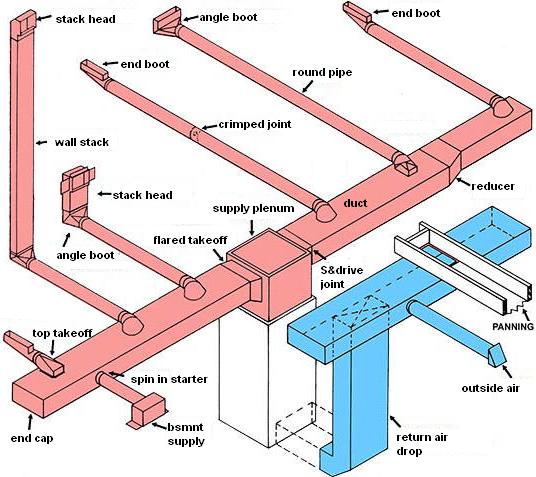
The plenum is a larger, more square duct which sits on top of the AHU or evap. coil. The top end is sealed with an end cap. Our example home requires a rectangular trunkline attached to the front of the plenum and another attached to the rear of the plenum. Cut off the plenum so it is 1" down from the ceiling. On the floor, cut in and attach the rectangular take-offs to the front and rear of the plenum. The take-offs may have an inside hammer-lock , which is a flange that bends over inside the plenum. Raise the plenum up in place and attach with self-tapping screws.
Visit our Duct Design pages. Here you will find many pages with diagrams and helpful hints for the do it yourself hvac installation, such as good ductwork practices, ductwork configuration and installation.
(click here)
Each length of supply air duct should be fully prepared on the ground. Each joint will need
S-cletes
for the longer top and bottom of the duct.
Drives
will be driven up the sides of the duct to lock each piece together. Measure where each branch duct will need to be tied into the top of the main trunk. While the duct is still on the ground, use the top take-off to trace the hole that will be cut in for attachment of the top take-off. The top take-off will have dovetails for attachment to the main trunk. Alternate the tabs, in and out, so half will be bent inside the duct to lock and seal the branch line to the main trunk.
Continue installing the lengths of ductwork until all floor outlets have been set up with a top take-off. The ends of each main trunk will be sealed with an end cap.
Our example home has an unfinished basement. Your project may have a finished basement, in which case, branch lines should be installed for the basement, as well. A finished basement should have it's own supply outlets and return inlets.
The branch ducts are galvanized round pipe recessed up inside the joist spaces. The pipe is installed out to the register location previously cut down through the floor. Here the supply branches are terminated with a boot. Pull the boot up through the plywood and nail in place. All joints need 3 screws and will need to be sealed with an approved duct tape or a mastic duct sealant. You will need to cut 2x4's or fashion sheet metal brackets to suspend the ducts inside the joist spaces.
The return ducting is installed to the side of the supply ducting. It should have been determined earlier which side works best for this location. The return inlets were cut down through the upstairs walls during the rough-in stage. The return ducting is installed to collect all returns together. If your upper returns are close together, the ductwork will be relatively short.
At each return location, cut open the top of the ductwork to match the joists where the returns are located. Flat metal (panning) is nailed up to the bottom of the joists to divert the airflow from the return grille, through the joists to the return trunk, and then to the AHU. Headers, or joist ends, need to be installed at each end of the panned joist to seal the return pathway. Both ends of the return trunk end with an end cap.
Add a basement return now, if necessary for a finished basement.
The return air drop is a vertical duct located along the side of the AHU. This duct connects the return trunkline to the blower compartment of the AHU. At the point where the return air drop connects to the bottom of the return air trunk, install a flared take-off. This fitting should have an inside hammer lock flange, which bends over inside the ductwork. The return drop continues to the floor and can terminate with an end cap or a 90* ell (best for airflow). The final length of duct may need to be cut to length.
Between the return air drop and the AHU, is the location for installation of the filtration system. Most upgraded filters or air cleaners require 7" to 10" Width for the cabinet. 1" wide filters are often cut into the bottom section of the return air ducting. A filter rack is built into the return drop itself and an access door is provided for future filter servicing.
Flat scrap pieces of sheet metal work well for this purpose. A few minutes spent here is time well spent. Nail down flat pieces of metal over all inlets and outlets. This will keep the ducts free of debris and save you from hiring a professional duct cleaner at the end of the project (approx. $1,200.).
The final registers and grilles are installed after sheetrock, painting, carpeting and floor coverings are completed.
Enjoy your system, and take pride in your do it yourself hvac project.

Visit Our Other Do It Yourself Hvac pages
Duct Design Basics: Follow Manual D Procedures
Do-It-Yourself: Install a Bypass Humidifier
Do-It-Yourself: Install a Powered Humidifier
Do-It-Yourself: Install a Steam Humidifier
Swamp Cooler Tech: Installation Recommendations for the Homeowner and the Do-It-Yourselfer
Swamp Cooler Roof Installation
Swamp Cooler Wiring and Water lines
Depart "Do It Yourself Hvac" and Return to HOME

