|
BASIC HOW-TO DUCT INSTALLATION
Before you start the duct installation! This page will address basic sheet metal duct installation tips and techniques. For this page we are assuming the most common forced air duct system: basement location, ductwork overhead feeding main floor above, and perhaps ceiling registers down for the basement. These basic techniques will easily transfer to other configurations, as well. Do you own a good pair of leather gloves and safety glasses? Sheet metal can be as sharp as a razor blade. One wrong move, and you're off to get stitches or to get a metal shard out of your eye. NOT FUN!
Tools needed for the project ahead
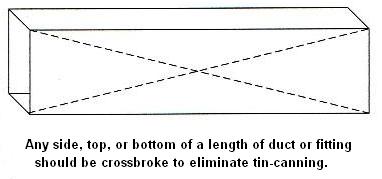 For residential duct installations, all ductwork and fittings should be made of a minimum 28-gauge metal. 26-gauge is better, 30-gauge is just too thin to control duct banging or tin-canning. Any side, top, or bottom of a fitting or a length of ductwork 12" or wider should be crossbroke to eliminate this!
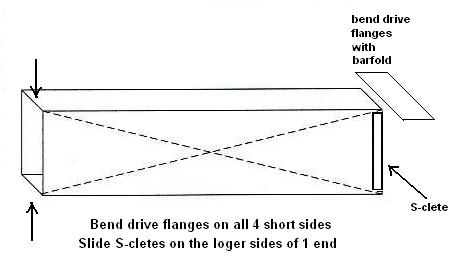
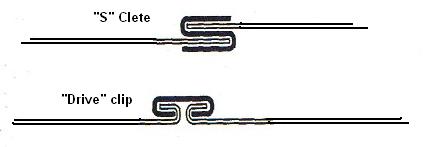
 A crossbreak is a light bend in the metal in an X from corner-to-corner. This adds strength to the duct surface and helps keep the duct system from waking you, with a bang, in the middle of the night. The "S and Drive Joint" The "S and Drive" joint is the most common type of duct joint used in residential duct installations. An S-clete forms a 1" overlap seal between the two longest edges (usually top and bottom) of the ductwork. A Drive clip (usually driven up the sides of a joint) locks the two sections of duct together, and also helps to seal the corners of the joint.
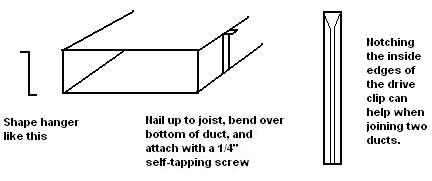
Hint: Drive clips can also be used as the hangers for your ductwork. Bend a 1" 90* bend out on one end of the drive. Nail it up where the side of your ductwork will be, then as you hang the ductwork, cut off the drive
allowing 1" to bend over the bottom of the duct. Grab your drill, drive in a 1/4" self-tapping screw. Mount another one for the other side of the duct.
Before each duct installation, trimming the inside edges of a drive can help when getting ready to hang a section of duct (see diagram below).
Prepare the Supply Air Plenum
Most duct installations start at the air handler/furnace. First determine which side, or bottom, that the return drop will be brought in to. If the return is to come in through the bottom, attach the base to the AH and raise the unit up into place. If the return is to attach to one of the sides, now is a good time to cut out the return opening in the side of the blower compartment.
Next install the air conditioner evaporator coil on top of the unit. If your system is AC only with an air handler, the AH is probably equipped with a built in coil.
Now you are ready to prepare the supply plenum.
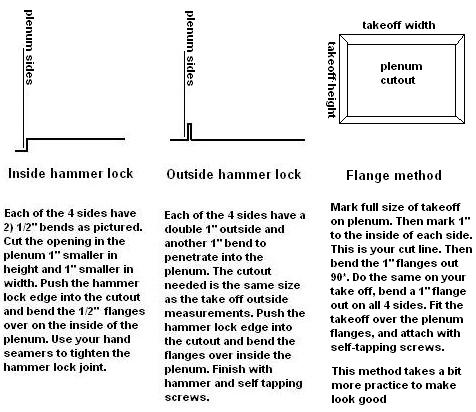
There are 3 basic attachment methods for take-offs and atarters. Discuss these methods with your fabricator. You will need to know how much metal to remove as you prepare for the attachment.
The three types are the Inside hammer lock, Outside hammer lock, or the flange method. (See the illustrations below)
Prepare the ductwork and duct fittings for installation
Every section of ductwork and every fitting in the system will need some preparation before it can be hung. This usually entails bending the drive flanges and sliding on S-cletes. Use the 3/8" side of the barfold to bend drive flanges. Keep the bends tight, and finish off by clamping down a bit with your hand seamers. But be careful to not smash down the drive flange completely.
Next, one end of each section of duct or fitting will need S-cletes fitted to the longer sides. Cut the cletes about 1/2" shorter than the duct width and slide on the two raw edges.
Related Ductwork Pages
Residential Ductwork System Drawings
Return to Duct Design main page
| |||||


 The supply plenum should be long enough to end 1" below the ceiling. Position the flared take-off cutouts to start the ductwork at 1" below the ceiling, as well.