Finalize Your Swamp Cooler Installation
Flashing, Shingles, and Set the Cooler
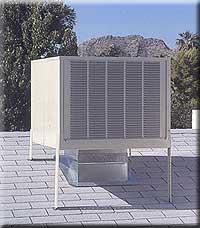
A nicely installed, well flashed, well maintained swamp cooler does not need to be an eyesore on your roof.
This swamp cooler installation (to the left) is about as clean an installation as they come.
We have all seen those rusty old coolers with the unsightly water stain down the length of the roof!
Regular maintenance of the pump, water inlet valve, making sure the water lines are free of leaks, and monitoring the proper water level in the reservoir will ensure against unwanted water loss onto the roof.
The best location, on most homes, to mount the swamp cooler is on the rear of the roof. This location is strictly an aesthetic decision. Most people simply don't want to see that cooler from the front view of their home. And if that unsightly stain does develop and you are 10 years from a new roof, well, at least it is on the back side.
Previous pages have shown the Do-It-Yourselfer
roof and ceiling penetrations, framing and ductwork installation.
We have also looked into the how-to's of
swamp cooler wiring and routing of the water line.
Other pages discussed
how the swamp cooler works and it's components
and also
tips on how to maintain and winterize a swamp cooler.
In this installment we will look at good flashing pratices and finally setting the cooler in place over the ductwork.
Roof Flashing
Flashing around the ductwork requires 4) 4"x4" sheet metal flashings bent on a 90 degree angle. you will also need a claw hammer, sheet metal snips, roof tar, your drill with a 1/4" hexhead bit, and some 1/4" self-tapping sheet metal screws.
On the following illustration, please note how the shingles overlap each other. We need to accomplish the same thing with the swamp cooler roof flashing.
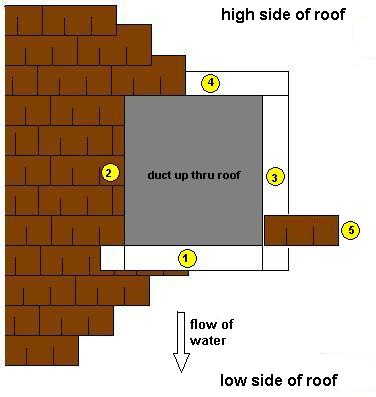
Refer to the above illustration
- 1) This flashing goes down first on top of the shingles. Bend so it is less than a 90* to match the angle of the roof. Screw top of flashing to the ductwork. Leave 4" extra length on each side. These will be overlapped by 2 and 3.
- 2 and 3) These side flashings go on next. They must slide up under the shingles. This will require some lifting of shingles and removing roofing nails that are in the way. Slide fully to the top edge of the ductwork. Screw the top edges to the ductwork.
- 4) This last flashing goes in last. It will need to be bent on more than a 90* angle to match the angle of the roof. This flashing needs to be under the shingles and over the top of the side flashings top edges. Screw top edge to the ductwork.
- 5) Illustrates the flashing beneath the shingles.
- 6) Using a good all-weather tar, seal all corners, flashing to duct joints, and any other possible leak points well. Take the time here to do a good seal job. Once the cooler is set, the sealing becomes much more difficult.
Other Related Swamp Cooler Info Pages
Swamp Cooler Installation
Swamp Cooler Wiring and Water lines
Swamp Cooler Maintenance
Return to Swamp Cooler main page
Return to Do-It-Yourself main page
Return to HOME
Enjoy this page? Please pay it forward. Here's how...
Would you prefer to share this page with others by linking to it?
- Click on the HTML link code below.
- Copy and paste it, adding a note of your own, into your blog, a Web page, forums, a blog comment,
your Facebook account, or anywhere that someone would find this page valuable.

